
How to Use the 1STKIT PRO Automatic Tire Deflator: Set, Calibrate and Air Down
Last updated:
Set the pressure on the scale, screw one deflator onto each tire, and wait. Each one stops by itself at the set pressure. Then take them off and put the valve caps back. The first time, check the result with your gauge and calibrate once.
This guide covers the 1STKIT PRO, a screw-on automatic tire deflator with a 10 to 30 PSI main scale and an auxiliary scale for fine adjustment. Using the clip-on Quick Connect instead? See How to Use the 1STKIT Quick Connect.
Easy to Miss: Read This First
- When you lock the setting, hold the adjustment ring and the main body together so the setting does not move as you tighten the locking cap. Then check that the setting is still where you set it.
- Before fitting a deflator, check that the valve stem is clean. If the valve cap was on, the valve stem is usually clean. If the cap was missing, press the valve core briefly to blow the dust out first. Valve caps matter: they help the deflators work reliably over the long term and save you unnecessary maintenance.
- Screw it on by the knurled base, not by the locking cap or the adjustment ring.
- If the tire is less than about 10 PSI above the setting, the deflator may not start by itself: pull the plunger gently.
- On first use, you may need to correct the setting against your gauge, because your gauge and the model and size of your tire and valve stem can all affect the result. Write the correction on the locking cap: it helps in the long run, so you do not have to calibrate again.
- Best practice: give each wheel its own deflator. Mark them and always use each one on the same wheel. Even valve stems of the same model can differ slightly from batch to batch, and you may fit new tires or valve stems later. With one deflator per wheel, each correction stays matched to its wheel, and if one tire ever ends up off, you know straight away which deflator to adjust (see First Use: Calibrate If Needed below).
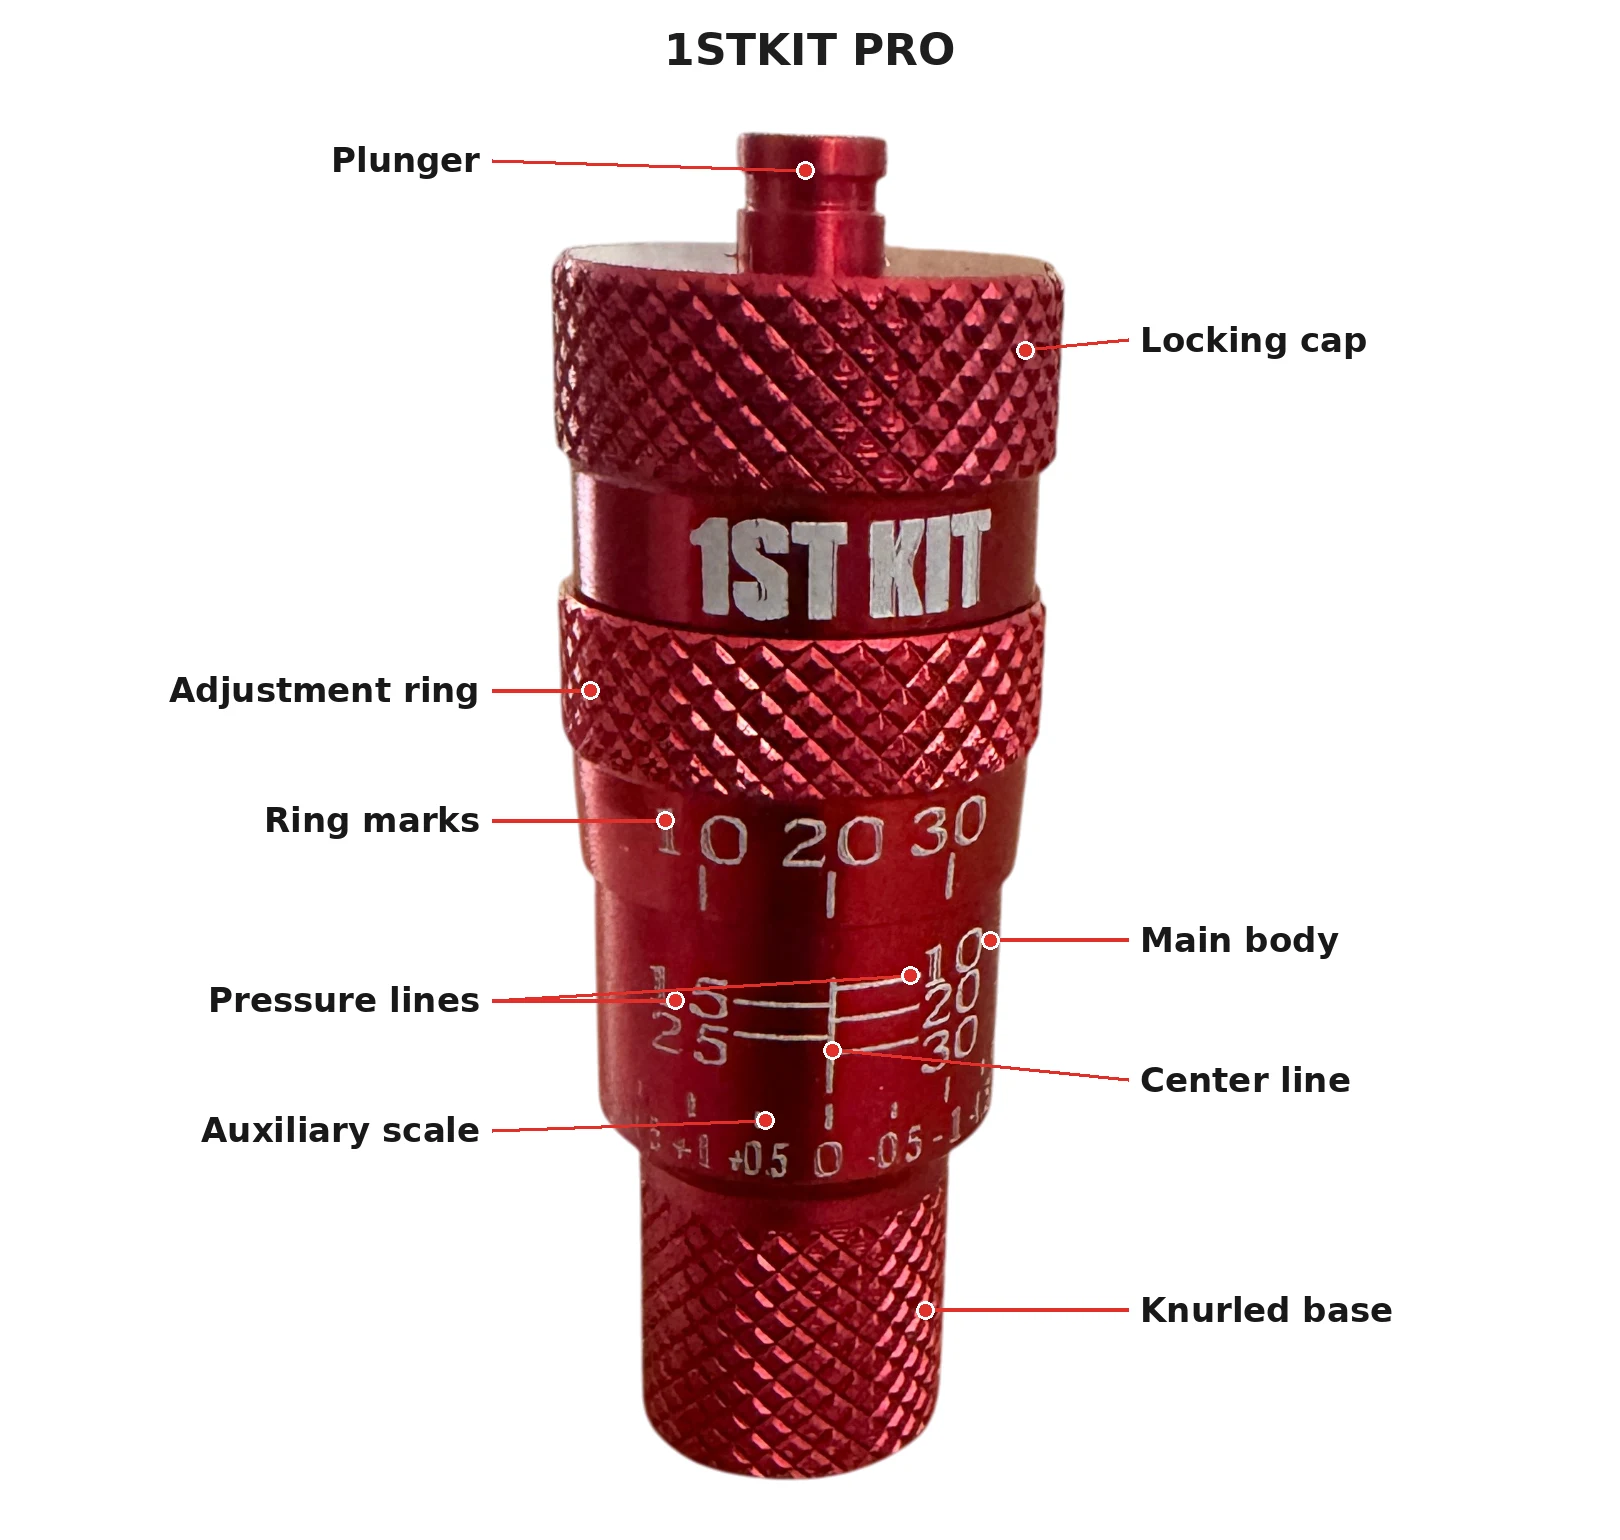
Know the Parts
- Plunger: sticks out of the top. You only touch it to start a deflator that does not start by itself.
- Locking cap: loosen it to change the setting, tighten it to lock the setting.
- Main body: the section below the adjustment ring. It carries the pressure lines, the center line and the auxiliary scale.
- Adjustment ring: turn it to set the pressure.
- Ring marks: 10, 15, 20, 25 and 30 on the adjustment ring.
- Pressure lines: horizontal lines on the main body, 10, 20 and 30 on one side, 15 and 25 on the other.
- Center line: the vertical line you line the ring mark up with.
- Auxiliary scale: +/- marks under the pressure lines, for in-between pressures and calibration.
- Knurled base: grip it here to screw the deflator onto the valve.
Step 1: Set the Pressure
- Loosen the locking cap.
- Turn the adjustment ring until its bottom edge almost reaches the horizontal mark for the pressure you want, for example 20.
- Line up the vertical 20 on the ring with the center line. Clockwise raises the pressure, counterclockwise lowers it.
- Hold the adjustment ring and the main body together with your fingers so they cannot turn, and tighten the locking cap.
For pressures between the marks, use the auxiliary scale. For example, line up the vertical 10 with -1 to set 9 PSI. The auxiliary scale wraps around (+4 and -4 are only 1 PSI apart), so you can keep turning to go beyond the printed range: lining up 10 with +4 gives 5 PSI, and 10 with +3 gives 4 PSI. The same works above the top mark.
Step 2: Screw On the Deflators
First remove the valve cap and make sure the valve stem is clean. If the cap was missing, press the valve core briefly so the tire's own air blows the dust out.
Screw it onto the valve stem by the knurled base. Do not twist it by the locking cap or the adjustment ring, or you may change the setting (touching them lightly is fine).
Put one deflator on each tire. Air starts flowing and all four tires deflate at the same time. If a tire is less than about 10 PSI above the setting, that deflator may not start by itself: gently pull the plunger to start it.
Step 3: Wait, Remove and Check
Each deflator stops by itself when its tire reaches the set pressure. From 40 to 20 PSI this takes about 2 minutes 20 seconds on a 32-inch tire and about 3 minutes 40 seconds on a 35-inch tire, with standard or TPMS valve stems. Take the deflators off, check the pressure with your gauge if you like, and put the valve caps back on.
First Use: Calibrate If Needed
The deflators are preset at the factory, but your gauge and the model and size of your tire and valve stem can leave a difference of 0 to 4 PSI. Check it once, and correct it if needed:
- Set the deflator to the pressure you use most, for example 20 PSI.
- Make sure the tire is at least 10 PSI above the setting, for example 30 PSI or more.
- Run the deflator until it stops, then read the pressure with your gauge.
- Work out the correction: if you set 20 PSI and the gauge reads 22.5 PSI, the correction is -2.5.
- Loosen the locking cap and turn the adjustment ring counterclockwise until its 20 mark lines up with -2.5 on the auxiliary scale. Lock it again.
You can calibrate all four deflators on four tires at the same time. If you use a valve extension, calibrate with it fitted.
Write the correction on the locking cap. It stays the same, so it saves you time later: if a deflator is dropped and the ring moves, after cleaning, or when you want a new pressure on the trail, just line up the new number with the same correction. No gauge check is needed.
For the most consistent results, give each deflator its own wheel. Mark them, calibrate each one on its own wheel, and always use it there. Small differences between tires and valve stems are then built into each correction, and if something is ever off, you know straight away which wheel or which deflator to look at.
Cleaning (Only When Needed)
Dirt from the valve stem or from inside the tire, such as residue after a plug repair, can be carried into the deflator by the escaping air and stop the plunger moving smoothly. Most people never need to clean them, but do it if:
- a deflator was dropped in sand, mud or water and dirt may have got into the air path,
- one deflator suddenly leaves a clearly higher or lower pressure than the others, or
- the tire is 10 PSI or more above the setting, but the deflator does not start letting air out by itself.
Before you start, check that the correction is written on the locking cap, or take a photo, so you can set the deflator back to the same position afterwards.
- Unscrew the locking cap and take out the plunger and the spring.
- Wipe the plunger with a soft, dry, clean tissue.
- Turn the main body upside down and tap it gently on a table that is not metal to shake out any debris.
- Roll up a tissue, push it into the main body and wipe the inside clean.
- Put the plunger back in. Twist and lift it to check it moves smoothly; when you let go, it should slide all the way down under its own weight.
- Reassemble and set it back to the setting it had before cleaning.
Clean one deflator at a time and never mix parts between deflators. If you rinse a deflator with water, dry every part completely, including the threads that connect to the valve stem, before you use it.
If the problem comes back after cleaning, the dirt may be coming from inside the tire. The easiest fix, without taking the tire off, is to roll the vehicle until the valve stem points down toward the ground, then remove the valve core. The fast airflow blows the debris out of the tire. Keep your face and eyes away from the valve, then refit the valve core and reinflate the tire.
Troubleshooting
| Problem | What to do |
|---|---|
| It does not start | If the tire is less than about 10 PSI above the setting, pull the plunger gently. If the tire is 10 PSI or more above and it still does not start, clean it. |
| The first result is off by a few PSI | Normal before calibration. Calibrate once and write the correction on the cap. |
| One tire ends up clearly different from the others | Check that deflator's setting, then clean it. |
| The pressure keeps dropping after it stops | Remove it and clean it; dirt is usually the cause. |
Which Vehicles It Suits
The threaded connection holds securely, so the PRO handles up to 180 PSI. Besides cars, SUVs and pickups, it also suits heavy-duty pickups, RVs, trailers and commercial vehicles whose tires run above 60 PSI.
Safety
- Reinflate to road pressure before driving on pavement or at speed.
- Never go below the minimum your tire maker allows for your load.
- Keep the valve caps on between trips, and store the deflators in their tin.
Still choosing? See How to Choose an Automatic Tire Deflator.
Frequently Asked Questions
How do I set the pressure on an automatic tire deflator?
Loosen the locking cap and turn the adjustment ring (clockwise raises the pressure, counterclockwise lowers it). For a multiple of 5, such as 20 PSI, line up that number with the center line. For any other pressure, first go to the nearest mark, then fine-tune with the auxiliary scale: for example, the 10 mark lined up with -1 gives 9 PSI. Then hold the ring and the main body together, tighten the locking cap, and check the setting has not moved.
Why does my deflator not start letting air out?
If the tire is less than about 10 PSI above the setting, the deflator may not start by itself. Pull the plunger gently to start it. If the tire is 10 PSI or more above the setting and it still does not start, clean the deflator.
Do I need to calibrate my deflators?
Only once. The deflators are preset at the factory, but your gauge, tire and valve stem can leave a difference of 0 to 4 PSI. Check the result once with your gauge, correct it on the auxiliary scale, and write the correction on the locking cap.
Can I do all four tires at the same time?
Yes. Put one deflator on each tire. All four run at once and stop by themselves at the set pressure.
How long does it take?
The air release time from 40 to 20 PSI is about 2 minutes 20 seconds on a 32-inch tire and about 3 minutes 40 seconds on a 35-inch tire, with standard or TPMS valve stems. All four tires run at once, so the only extra time is putting the deflators on and taking them off.
Can I use it on trucks with high tire pressure?
Yes. The PRO screws onto the valve and handles up to 180 PSI, so it suits heavy-duty pickups, RVs, trailers and commercial vehicles as well as cars and SUVs.